iOS 7 – Add Parallax Effect to Your Apps using UIMotionEffect API

One of my favorite iOS 7 features is the sense of parallax – where you can see how icons move around on the home screen or how alert views float above other views. It’s a really great way to give users the sense of depth and motion in your apps – even while fully embracing the iOS 7 theme (a simplified and flat user interface).

ParallexInMotion
Take a look at the use of parallax on the home screen. Notice how the background appears behind the app icons and the badge appears to float above it. Motion effects tie animations to the movement of the iOS device.
 
Apple has made this extremely easy to implement! This is made possible by using UIMotionEffect. This is the API that is used to create effects just like you see on the home screen. UIMotionEffect takes the iOS device motion as an input.
 
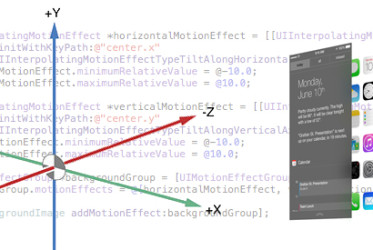
For me to understand how motion effects work, I really needed to understand what the inputs are to device motion. The below helped me out.
 
As I tilt my iPhone to the right, I get a positive 1 effect. As I tilt it to the left, a negative 1 effect. As I tilt it down, I get a positive 1. And tilting up, I get a negative 1 effect.
 
To further the simplicity of adopting the motion effects in your app, Apple provides the subclass UIInterpolatingMotionEffect.
 
It’s very easy to use interpolating motion effects to interpolate between the minimum and the maximum value that is defined. The animation is applied to a key path this is provided. From there, the interpolating motion effect is automatically updated, based on the iOS device motion as the user interacts with the screen. And all that is needed to make this work is to attach them to a UIView anywhere in your app. It really is that simple!
 
First, you need to create two instances of an UIInterpolatingMotionEffect. One for the x-axis and one for the y-axis.
 
Create one with a key path of center.x and set its type to UIInterpolatingMotionEffectTypeTiltAlongHorizontalAxis. Give it a minimum and maximum relative value of negative 10 and 10. This means that wherever center.x is normally for that view, it will not deviate more than 10 points in either direction on the x-axis.
 
You need to do the same thing for the y-axis. It is almost the same code. The only thing that is different is the key path, which is now center.y and the type is vertical access. And since you want these to be evaluated at exactly the same time, you should create a motion effect group.
 
 
I think motion effects are a really cool way that we can use to make all of our apps come alive! They can make the apps feel really interesting and engaging.
 
There are more advanced motion effects to check out. The UIMotionEffect Class Reference: https://developer.apple.com/library/ios/documentation/uikit/reference/UIMotionEffect_class/Reference/Reference.html

What’s on your Lock Screen? Implementing MPNowPlayingInfoCenter

I am in the midst of creating an iOS mobile app for a client that will play a variety of audio tracks.
 
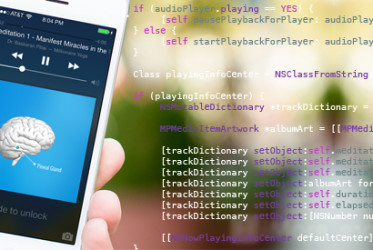
One of the features that I wanted to implement was to display information about a currently-playing audio track on the lock screen. This is one of those simple convenience to a mobile user and a must-have if your app has background audio playing. Personally, I use this feature all the time!
 
This is quite simple to implement in any of your current projects.
 
What is needed is the MPNowPlayingInfoCenter Class. You can review the documentation by visiting the Apple Developer Reference.
 
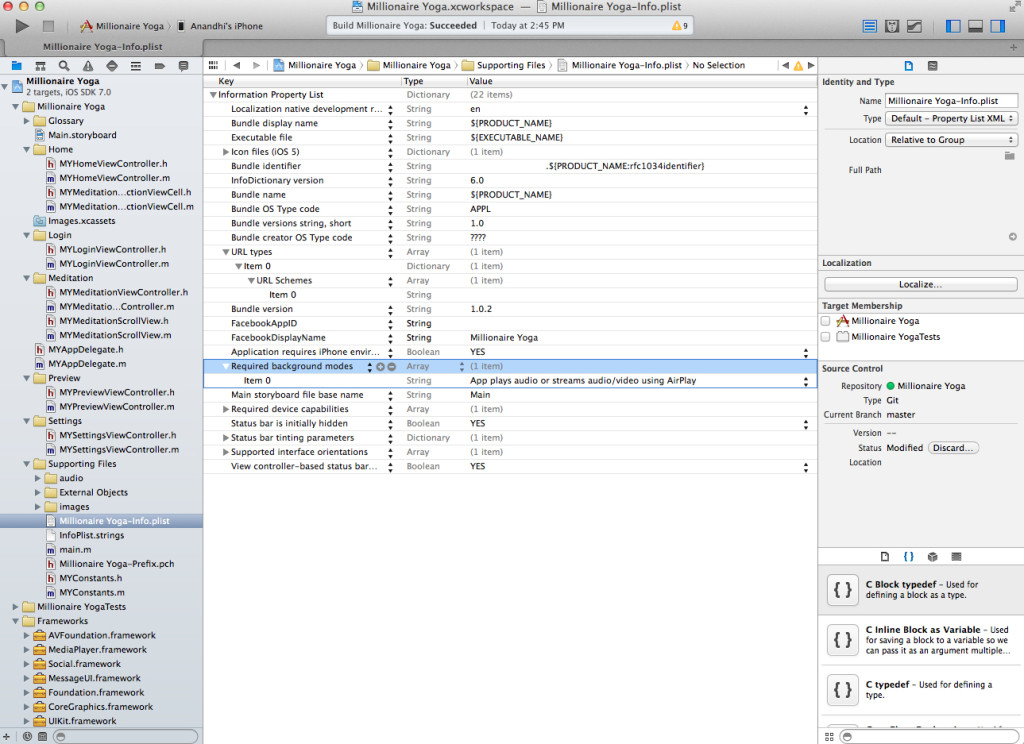
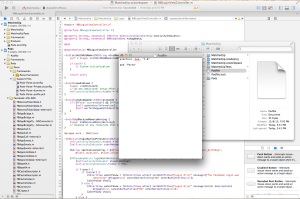
Go ahead and open your project. You will have to make one change in your application’s info.plist file. This change will let the iOS know that you want to play background audio.
 
Right Click and select ‘Add Row‘. Type in ‘Require Background Modes’. This will create an array called ‘Item 0’. Change it’s value to ‘App plays audio or streams audio/video using AirPlay’.
 
Once finished, it should look like this:
 
01_Plist
 
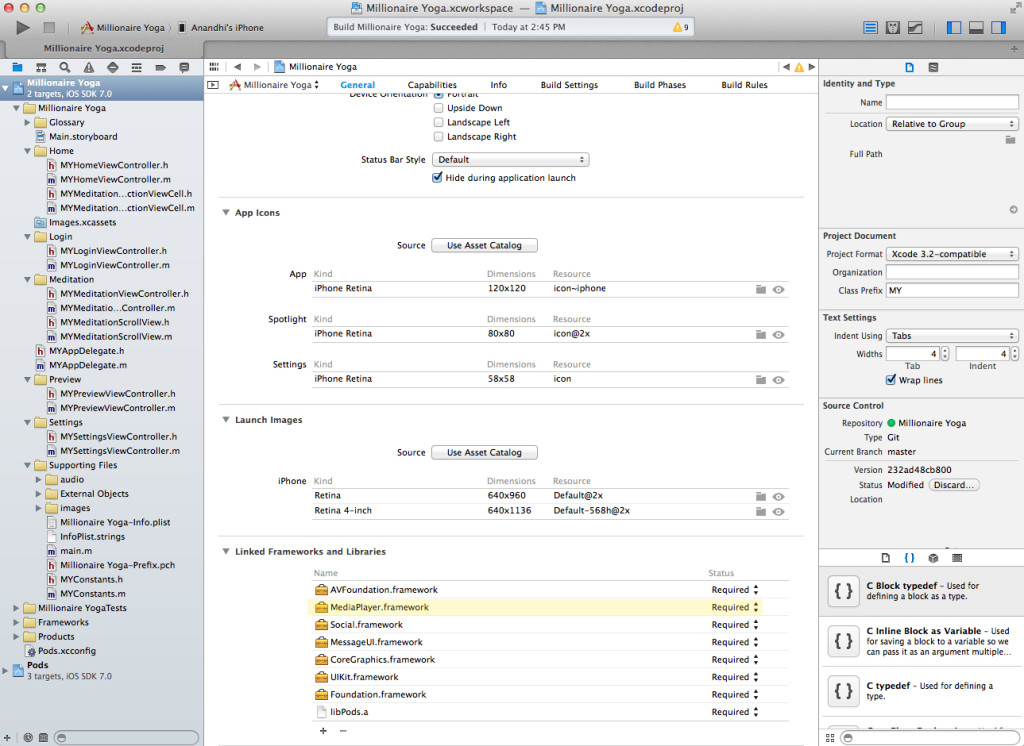
Now you will add the MediaPlayer.framework to your project:
 
02_Framework
Next, you want to import the following two class into the top of your implementation file:
 

Finally, you want to add the following to your audio button in your implementation file. Of course, you will have to modify the below to fit with your project. However, this should get you started!
 

Hello GitHub, my name is Melissa

HoraWatch_GitHubI was introduced to GitHub a few month’s back. I was hooked instantly!

To be honest, (don’t cringe too much) I have never used any type of version control software (VCS) for my personal programming projects. However, one day, I found myself in that awkward position where I wished I did have a VCS in place. It took a lot of ‘wasted’ time and effort to refactor my code to a previous state – ouch!

My introduction to GitHub came via CodeCoalition‘s iOS Bootcamp. During the course, the instructors shared just a few commands – enough to give the students the basic knowledge of GitHub.

You may be wondering – what is GitHub anyway? At the core, it is Git – a version control system that manages and stores revisions of projects. GitHub is a web-based hosting service that uses the Git version control system, while adding many of its own features. GitHub is more than just a programmer’s tool. If you want to collaborate on anything, GitHub is the way to go! It is now the largest online storage space off collaborative works with all the social networking perks.

Why use something like Git? Has there ever been a time where you found that you and a colleague are both updating pages within the same website? You have made your changes to the page, saved them, and uploaded them back up to the website. At the same time, your colleague is working on the same page as you. One of you is about to have your work overwritten…erased…gone!

By having a version control software in place, the example above would not have happened. You and your colleague can each upload your revisions of the web page – two copies will be saved (respectively). The next step would be to merge your changes without losing any work along the way. A great feature of VCS is that you can even revert back to an earlier version at any time, since it keeps a ‘snapshot’.

With the many current mobile projects that I am working on, I decided to upgrade my GitHub account to a paid subscription. I also found the need to expand my knowledge on the commands specific to Git (and Terminal). This has already proved to be a life saver.

Below are some of the Git commands most helpful to me.

common git commands for reference

git help

create a new local git repository
git init

clone an existing repository
git clone https://github.com/username/repositoryname

lists changed files in your working directory
git status

list changes to tracked files
git diff

add all current changes to the next commit
git add .

add some changes in to the next commit
git add -p

commit all local changes in tracked files
git commit -m "commit message here"

publish local changes on a remote
git push -u origin master

show all commits, starting with newest
git log

create new branch and switch to using it
git checkout -b

switch back to master
git checkout master

delete branch
git branch -d

update local repository to the newest commit
git pull

merge another branch into your active branch
git merge


There are many great resources and tutorials out there on how to get started with GitHub. To get started, I recommend visiting GitHub’s Help Section: Set Up Git.

Quick and Dirty: How to Install Parse Framework to your Xcode Project

MatchedUpWith more complex objective-c projects, you may find yourself wanting to install many 3rd party libraries. This could be time consuming, difficult and a lot of work. Here is a default way to install the necessary programming language and packages.

The goal is to use CocoaPods to manage your dependencies. But in order to install CocoaPods, you first need to install ruby and ruby gems. So there is a bit of setup. However, this will save a lot of time and lessen any errors for future mobile app development.

Step 1: Install Homebrew

Many people on Mac OS X use Homebrew as a package manager.

Paste the following script in Terminal:

     ruby -e "$(curl -fsSL https://raw.github.com/mxcl/homebrew/go/install)"

The script explains what it will do and then pause before it does it.

Step 2: Install Ruby

After Homebrew is installed, you can now install the latest version of Ruby. Type the following in Terminal:

     brew install ruby

Step 3: Install Ruby Gems

To install the latest version of Ruby Gems, type the following in Terminal:

     sudo gem update --system

Step 4: Install CocoaPods

To install the latest version of CocoaPods, type the following in Terminal:

     sudo gem install cocoapods

Now you are ready to install the Parse SDK!

In Xcode, create a project. Go ahead and close the Xcode project. Now we need to add the Parse framework. Return to Terminal and navigate to the directory where your new Xcode project was created in.

Create a podfile by typing the following in Terminal:
     touch Podfile

Open the podfile and add the following lines:

     platform :ios, '7.0'

     pod 'Parse'

Save and close the podfile.

To Install the Parse SDK, type the following in Terminal:
     pod install

Moving forward, open the xcworkspace file instead of the xcodeproj file.

TA DA! You can now see both the Parse and the Facebook framework in your Xcode project.

Why build a native mobile app rather than a HTML5 web app?

This is a question I have been asked over the years and doesn’t seem to be going away. Given the benefits of HTML5 why not just develop in this format rather than fully native separately for iOS, Android and Windows? Even when I started developing native apps I was being told that native apps would quickly be made redundant by HTML5, yet here we are 4 years later with a growing demand for native app development.

HTML5 is a brilliant way of creating graphically rich, intuitive applications that can be restructured remotely and deployed on multiple platforms. However if you think that is the end of the debate then your would be very wrong; The advent and the widespread use of smartphones has sparked the development of fully native apps, written platform specific using the API’s provided by the system. Native apps provide a level of user experience, performance, monetization and security not available though an HTML, browser based web-app. Native app developers have access to as many as 7000 device capabilities and to features such as the camera, location, contact lists, calendar, near-field-communication and local memory to a far greater degree than is possible by HTML5.

Speed

A considerable benefit of native over HTML5 is speed. A native app doesn’t have the added overhead of having to download the design layer in addition to its content, it can concentrate on only downloading the data for the app. In addition much of this content can be cached and used offline or used whilst the latest data is being downloaded in the background. As a result native apps load faster regardless of the strength of your internet connection.

Marketing

One final benefit that is often overlooked in this debate is the marketing benefit of a native app; the home screen on a person’s smartphone is a very valuable piece of real estate for a brand. If you can get your brand on a person’s phone, then they viewing it many hundreds (even thousands) of times a week. It is our view that a native app installed on someone’s phone has huge marketing value to a brand.

Numbers speak

According to a March 2013 Compuware Survey, around 85 percent of mobile professionals showed preference for mobile apps over mobile websites. This was attributed to the richer user experience that native apps generate.

Most of the apps I produce are given away in the app stores for free, but a number are paid for apps. According to numbers presented by this year’s Canalys report, the combined income of native developers stood at $2.2 billion for Q1 2013. The picture is in stark contrast to the other side with the report suggesting that the monetization was zero for developers who were creating HTML5 applications.

So there we are, we’re stuck on native apps, we love them and see that they are here to stay. If you’d like to talk more with me about a native app for your brand/company then please get in touch with me.